Using node.js and adb on a Raspberry Pi to pause my show when my Nebula projector autofocuses
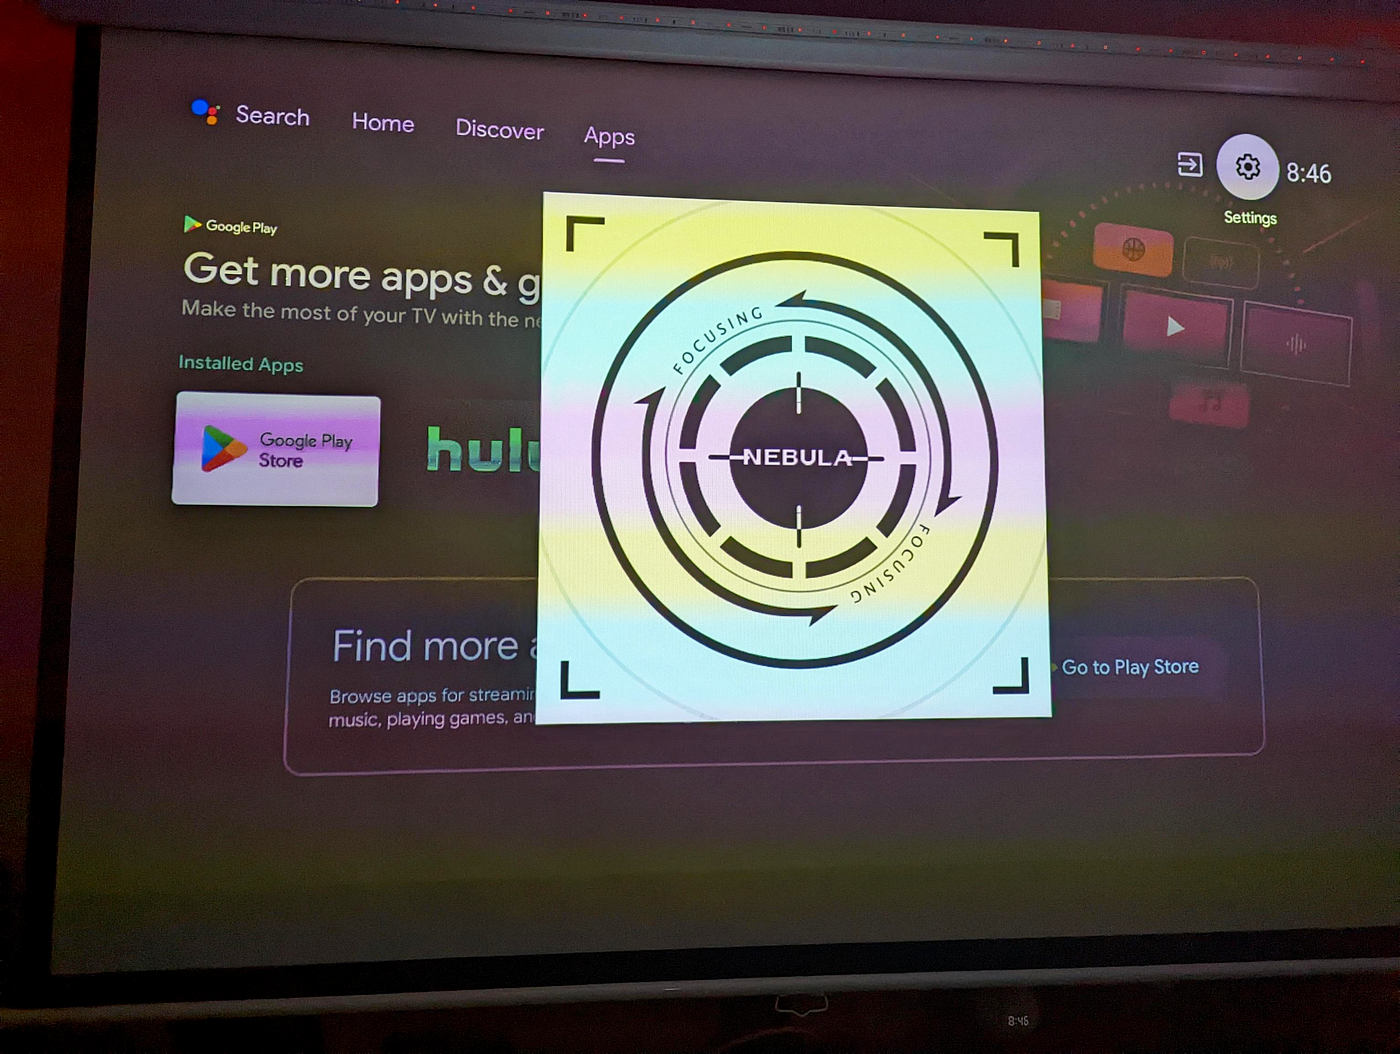
I backed the Nebula Cosmos projector on Kickstarter and overall love the product. The projector automatically refocuses shortly after turning on to make your image sharp. It projects a symbol on the screen, overlaying the other content, and adjusts the projector lens until it can detect that the image is in focus.
Because the projector heats up after being on for a while, it automatically refocuses again after about 30 minutes. This unfortunately can interrupt your content, since most likely you’ve started watching something by the time the projector has been on for 30 minutes.
We usually stream shows from a Fire TV Stick that is connected to the projector. I knew that both the projector and the Fire TV Stick both run on Android OS, so I figured there might be a way that, with a little bit of code, I should be able to programmatically control both devices — so that, whenever the projector begins automatically focusing, the show that I’m watching will automatically pause, then resume when the projector has finished its job.
Table of Contents
Setting up the Raspberry Pi
• Installing Raspberry Pi OS
• Installing adb
• Installing node.js
Enabling Android developer options
• Enable ADB Debugging on the Fire TV
• Enable ADB Debugging on the projector
Controlling the Fire TV using adb
Reading the projector’s logs using adb
Writing the script
• Monitoring the projector logs
• Pausing the Fire TV during autofocus
Using pm2 to keep the script running
• Installing pm2
• Running the script with pm2
Setting up the Raspberry Pi
I had a Raspberry Pi 4 Model B lying around that I hadn’t gotten around to using, so to begin, I started with a fresh installation of the default Raspberry Pi OS.
Installing Raspberry Pi OS
The Raspberry Pi doesn’t have any internal storage, so everything has to be stored on an SD card — so it’s definitely a good idea to invest in a card that not only has sufficient space, but also fast read/write speeds, or else it will be painfully slow.
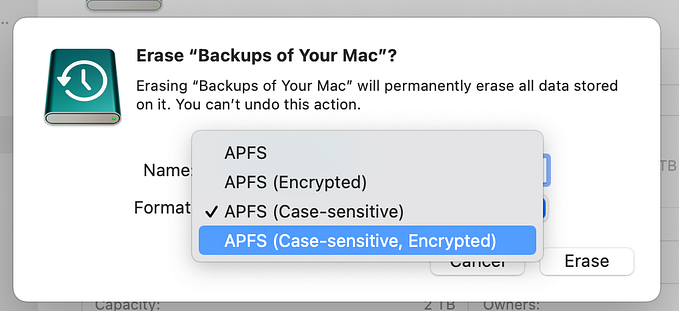
The easiest way to get started with a Raspberry Pi is to download the latest version of the operating system and write it to the SD card using the Raspberry Pi Imager app on your computer.

Connect the SD card to your computer and select it by pressing CHOOSE STORAGE.
Press CHOOSE OS and select Raspberry Pi OS (32-bit).

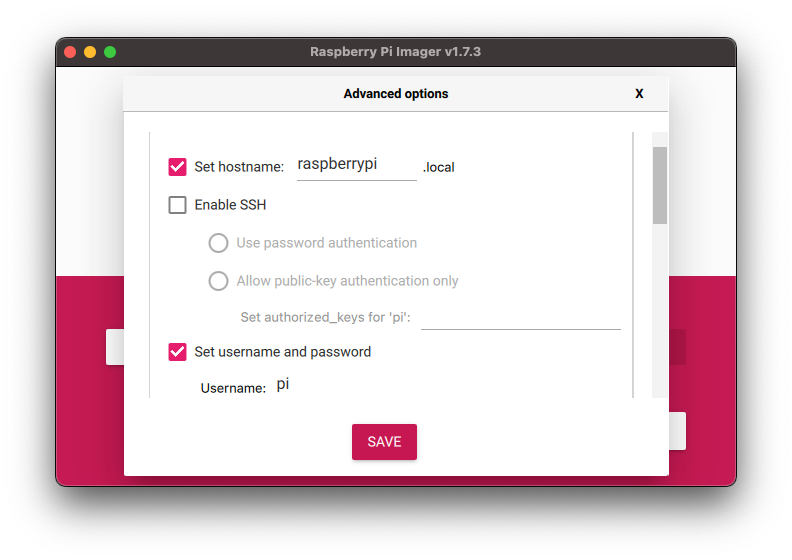
Before you tap WRITE, you might want to click the “gear” icon to view the Advanced Settings. From here you can pre-configure your Pi which will make setup easier.
For example, if you enable Set username and password, you can set the administrator username/password. And if you check Configure wireless LAN, you can setup the WiFi connection for your Pi. I also recommend checking Set locale settings and choosing your time zone and keyboard layout (“us” for United States), since sometimes the Pi’s default settings won’t match your preferred keyboard.
When you’re ready, go ahead and write to the SD card. When the Imager finishes, you can eject the card from your computer and insert it into the slot in your Raspberry Pi.
Plug in the power cable and connect the HDMI 0 port to a monitor using a micro-HDMI to HDMI cable.
The first thing we want to do is get everything up-to-date. Open the Terminal application and enter the following commands:
sudo apt-get update
sudo apt-get dist-upgrade
(By the way, to paste text from the clipboard into the terminal to run as a command, either select Edit > Paste from the terminal menubar or us the keyboard shortcut Ctrl + Shift + V.)
Installing adb
adb stands for Android Debug Bridge, and it’s the command line tool that we’ll use to connect to both the Fire TV Stick and the projector. Once we have set up adb, we can use it to determine when the projector is autofocusing as well as to control playback on the Fire TV.
sudo apt-get install android-tools-adb android-tools-fastbootInstalling node.js
My language of choice is JavaScript, so I decided I would write the script using node.js. While we’ll only use one version of node.js, I tend to like installing nvm on new machines when I want to use node.js, since it lets me install more than one version if I need it and easily switch between them.
The easiest way to install nvm is to just run a bash script, which is described in their installation instructions. At the time of writing, this was the command I used to install it — but you should check out their documentation for the most up-to-date command:
curl -o- https://raw.githubusercontent.com/nvm-sh/nvm/v0.39.2/install.sh | bashAfter nvm is installed, it will automatically add some code to ~/.bashrc. We can pick up those new changes by running the following command:
source ~/.bashrcNow we can install the latest version of node.js. Use the following command to install the current (LTS) version, which was 18 at the time of this writing:
nvm install --lts
nvm install-latest-npm
Now we can check that node is installed by running:
node -vwhich should return something like 18.12.1.
Enabling Android developer options
adb allows the Pi to communicate with Android devices that are connected to the same WiFi network. However, by default, Android devices don’t have developer mode on for security purposes. We’ll have to enable it on both the Nebula Cosmos projector and the Fire TV.
Enable ADB Debugging on the Fire TV
On the Fire TV, navigate to the “gear” icon to enter settings, then select My Fire TV.
Select About to open the About menu. Then press the select button on your remote seven times. This will open up a hidden menu that is only intended for developers.
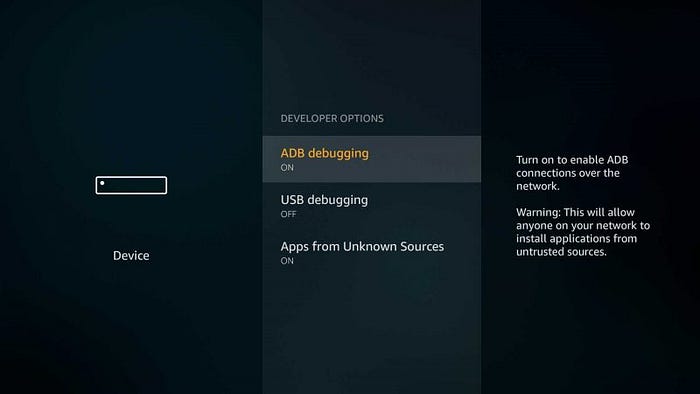
Press the back button on the remote to return to the My Fire TV menu. There should be a new list item now called Developer Options.
Select Developer Options. Then select ADB debugging to toggle it on.
Press the back button again and return to the My Fire TV menu. This time, select Network.
You’ll see some details on the righthand side. Write down the IP Address for later; we’ll need this to connect to the Fire TV Stick using adb.
Enable ADB Debugging on the projector
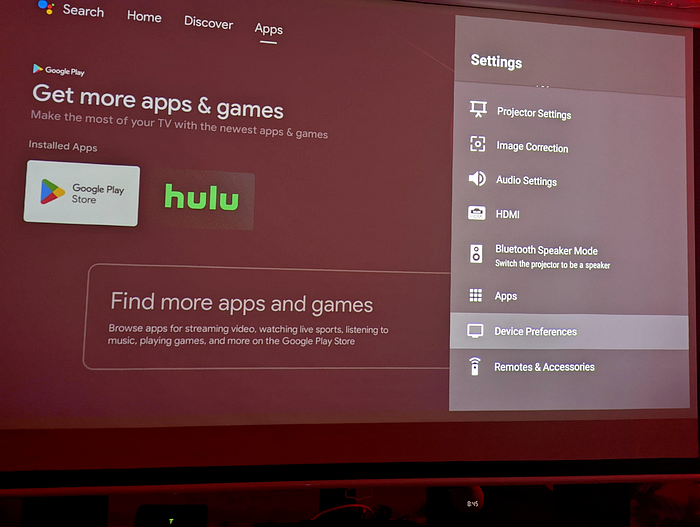
Press the “gear” icon on the projector remote to launch the projector settings menu. Select Device Preferences.
Select About, then scroll down to Build.
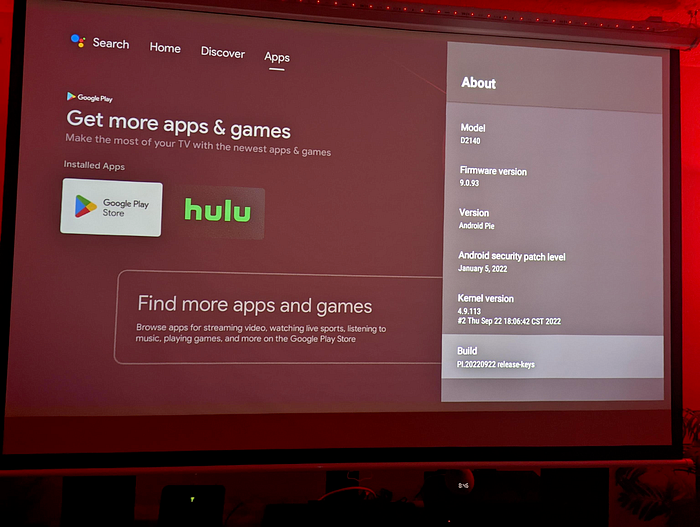
Press the select button on the remote seven times, or until you see a message that indicates developer mode has been enabled.
Now hit the back button to return to Device Preferences. Select Developer options.
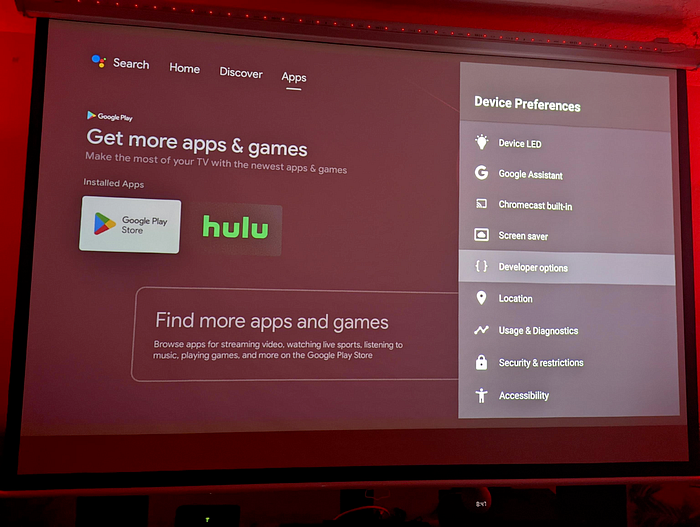
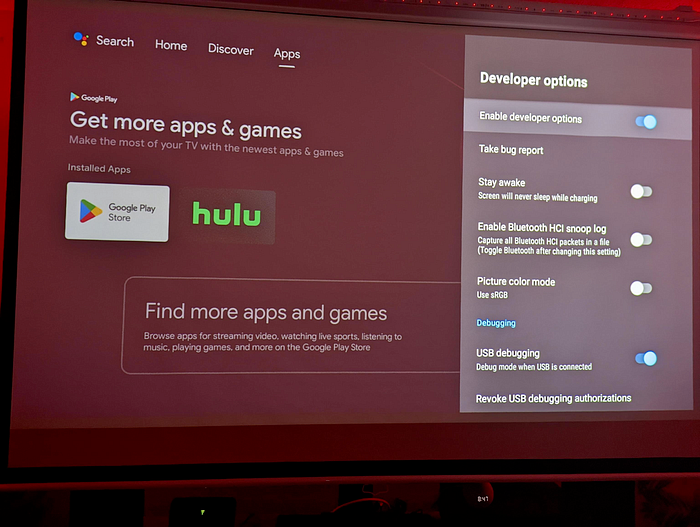
Toggle on Enable developer options and make sure USB debugging is enabled.
Controlling the Fire TV using adb
Let’s try out the adb cli now that our devices are ready.
On the Pi, open a terminal window and use the following command, replacing <firetv_ip> with the IP address of the Fire TV stick:
adb connect <firetv_ip>:5555After you run this command, a pop-up should appear on your Fire TV:
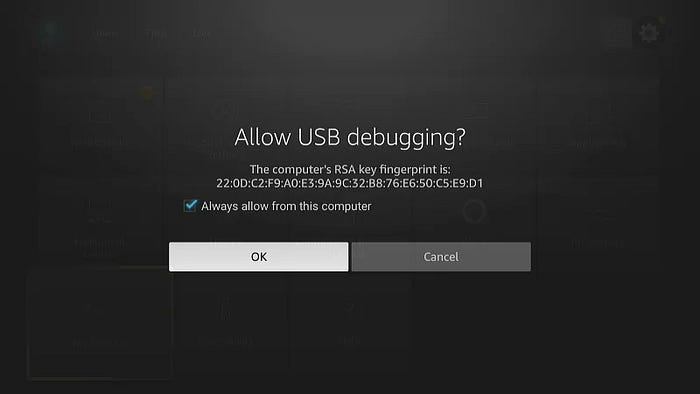
Make sure to check the box next to Always allow from this computer and press OK.
You should get some output saying connected to <ip>. If the command timed out, just run it again once you’ve accepted the connection from the Fire TV.
Now we can try sending a command. Go ahead and start playing something on the Fire TV. Then enter this command on the Pi, and the playback should pause:
adb -s <firetv_ip>:5555 shell input keyevent 85(85 is the keycode for the play/pause button.)
If everything goes well, your content should be paused. Sending the same command again should simulate pressing play/pause again and resume playback.
Reading the projector’s logs using adb
Next, let’s use a different adb command to see if we can observe when the projector starts and stops the autofocus procedure.
We’ll need to use the connect command again to establish a connection with the projector. Replace <projector_ip> with the projector’s IP address this time:
adb connect <projector_ip>:5555Just like with the Fire TV, the first time you try to connect to an Android device, a pop-up will be displayed on the device. You’ll have to check the box and accept the connection to continue.
Note that your Pi is still connected to the Fire TV Stick as well. You can check by running adb devices, which will list all the devices we’re currently connected to.
We can use the logcat command to tail the logs:
adb -s <projector_ip>:5555 logcatYou should see a ton of output here. Grab the projector remote and press the focus button. If you watch the logs carefully, you should see some messages stick out. Look for log messages that mention FeelingFocusTask, which is the job the projector executes whenever the autofocus is working.
In our script, we’ll need to be watching these logs and deciding to play/pause when some specific actions occur. I decided that I would pay attention to these logs:
TaskManager: add task:FeelingFocusTask
FeelingFocusTask: onFocusFinished
It seems that the first line gets logged when the projector starts the autofocus, and the second line gets logged when the autofocus job completes.
(To stop watching the logs, press Ctrl + C in the terminal.)
Writing the script
Monitoring the projector logs
Now that we know how to control the Fire TV programmatically as well as how to watch the log output from the projector, now we just need to write a script that will automate the whole process.
We’ll need to leverage the child_process module so we can run terminal commands within our script.
Create a new folder on the desktop called projector_script. Inside it, create a new text file called main.mjs.
import { spawn } from "child_process";

const PROJECTOR_HOST = "<projector_ip>:5555";

function watchProjectorLogs() {
  const child = spawn(
    "adb",
    ["-s", PROJECTOR_HOST, "logcat"],
    { stdio: "pipe" },
  );

  child.stdout.setEncoding("utf8");
  child.stderr.setEncoding("utf8");

  child.stdout.on("data", (chunk) => {
    console.log("STDOUT CHUNK RECEIVED:", chunk);
  });

  child.stderr.on("data", (chunk) => {
    console.log("STDERR CHUNK RECEIVED:", chunk);
  });

  child.on("close", () => {
    console.log("logcat exited");
  });
}

watchProjectorLogs();
First, we call spawn() to create a new child process. Node.js is asynchronous by nature, so when we call spawn(), it doesn’t block the rest of the code from executing until the child process is finished. This is definitely a good thing, because we are calling the logcat command, which will run practically forever, always printing out more logs as the projector does work in the background.
Because it’s asynchronous, in order to keep track of the data written by the child process to stdout/stderr we can use event listeners. Whenever a new chunk of data is written to either stdout or stderr, the event listener function is executed. For instance, any time some more content is printed by logcat to stdout, we should see a message in the console: STDOUT CHUNK RECEIVED: <data>. The stdout and stderr properties on the child object are called streams. They emit events such as data when there is more data that can be read from the stream.
If the logcat command exits on its own, which might happen for example when the projector goes to sleep, the close event will be emitted on the child process.
By calling setEncoding("utf8") on the child.stdout and child.stderr streams, we are telling node.js that the child process will be printing plaintext to the console and that we want to treat it as UTF-8-encoded text.
Now let’s try running our new script from Terminal. Move to the directory where our main.mjs file is and invoke it using node:
cd ~/Desktop/projector-script
node main.mjs
It should start spitting out all the log messages we saw when we tried using the logcat command ourselves.
Unfortunately, the “chunks” of data that are passed to our event listener are sometimes of arbitrary length. As a result, one chunk might have more than one line of output from the logs, or a chunk might be split in the middle of a line of output. This means if we want to write some code that checks if the chunk contains a message like TaskManager: add task:FeelingFocusTask, we might run into an issue where our listener receives one chunk that reads TaskManager: add and then is called again with another chunk containing task:FeelingFocusTask.
Fortunately there’s another built-in node.js module that can help us with streams, and specifically reading data from streams line-by-line, appropriately named readline.
import { spawn } from "child_process";
import { createInterface } from "readline";

const PROJECTOR_HOST = "<projector_ip>:5555";

function watchProjectorLogs() {
  const child = spawn(
    "adb",
    ["-s", PROJECTOR_HOST, "logcat"],
    { stdio: "pipe" },
  );

  child.stdout.setEncoding("utf8");
  child.stderr.setEncoding("utf8");

  const readline = createInterface(child.stdout);

  readline.on("line", (line) => {
    console.log("STDOUT LINE RECEIVED:", line);
  });

  child.stderr.on("data", (chunk) => {
    console.log("STDERR CHUNK RECEIVED:", chunk);
  });

  child.on("close", () => {
    console.log("logcat exited");
  });
}

watchProjectorLogs();
Now, whenever a newline character (\n) is encountered, our line event listener will be called with the text of the entire line from the log output.
Now, because we ran this script after we had just set up adb on the Pi, we were already connected to the projector. But we should assume that, after the Pi is rebooted, we’ll no longer be connected. So let’s make sure that this script accounts for the connect command.
import { spawn } from "child_process";
import { createInterface } from "readline";

const PROJECTOR_HOST = "<projector_ip>:5555";

function connectToProjector() {
  const child = spawn(
    "adb",
    ["connect", PROJECTOR_HOST],
    { stdio: "pipe" },
  );

  child.stdout.setEncoding("utf8");

  let stdout = "";
  child.stdout.on("data", (chunk) => {
    stdout += chunk;
  });

  child.on("close", () => {
    stdout = stdout.trim();

    if (
      stdout.startsWith("connected to") ||
      stdout.startsWith("already connected to")
    ) {
      console.log("Connected to projector");
      watchProjectorLogs();
    }
  });
}

function watchProjectorLogs() {
  const child = spawn(
    "adb",
    ["-s", PROJECTOR_HOST, "logcat"],
    { stdio: "pipe" },
  );

  child.stdout.setEncoding("utf8");
  child.stderr.setEncoding("utf8");

  const readline = createInterface(child.stdout);

  readline.on("line", (line) => {
    console.log("STDOUT LINE RECEIVED:", line);
  });

  child.stderr.on("data", (chunk) => {
    console.log("STDERR CHUNK RECEIVED:", chunk);
  });

  child.on("close", () => {
    console.log("logcat exited");
  });
}

connectToProjector();
This time, the child process is for the adb connect command, which, unlike logcat, is not meant to run for a very long time and output a ton of text. Because it’s not going to spit out tons of output, we can safely keep all of the output in memory. That’s why we set up a stdout = "" variable to keep track of all the output of the process and concatenate whenever we get more output. When the process finishes (emits the close event), we can take a look at the stdout text to verify that the result of the command was successful by checking whether the output starts with connected to or already connected to. If the output matches, then we start the other child process, which starts logcat.
Return to the terminal and press Ctrl + C to stop the script, then repeat node main.mjs to start it again. The connectToProjector function should try running adb connect to the projector, receive the message already connected to <projector_ip>:5555, then proceed to call watchProjectorLogs like before. Kill the script again with Ctrl + C, then use the following command to stop the adb server:
adb kill-serverNow no devices should be connected. Run the script again with node main.mjs; this time, the connectToProjector function will call adb connect which will automatically start the adb server again, then receive the message connected to <projector_ip>:5555.
Next, let’s test each line of the logs to see if the log message indicates that the autofocus task has started or stopped:
import { spawn } from "child_process";
import { createInterface } from "readline";

const PROJECTOR_HOST = "<projector_ip>:5555";

function connectToProjector() {
  const child = spawn(
    "adb",
    ["connect", PROJECTOR_HOST],
    { stdio: "pipe" },
  );

  child.stdout.setEncoding("utf8");

  let stdout = "";
  child.stdout.on("data", (chunk) => {
    stdout += chunk;
  });

  child.on("close", () => {
    stdout = stdout.trim();

    if (
      stdout.startsWith("connected to") ||
      stdout.startsWith("already connected to")
    ) {
      console.log("Connected to projector");
      watchProjectorLogs();
    }
  });
}

function watchProjectorLogs() {
  const child = spawn(
    "adb",
    ["-s", PROJECTOR_HOST, "logcat"],
    { stdio: "pipe" },
  );

  child.stdout.setEncoding("utf8");
  child.stderr.setEncoding("utf8");

  const readline = createInterface(child.stdout);

  readline.on("line", (line) => {
    if (line.includes("TaskManager: add task:FeelingFocusTask")) {
      console.log("AUTOFOCUS STARTED");
    } else if (line.includes("FeelingFocusTask: onFocusFinished")) {
      console.log("AUTOFOCUS FINISHED");
    }
  });

  child.stderr.on("data", (chunk) => {
    console.log("STDERR CHUNK RECEIVED:", chunk);
  });

  child.on("close", () => {
    console.log("logcat exited");
  });
}

connectToProjector();
Kill the script again by pressing Ctrl + C in the terminal, then start it again via node main.mjs. Now instead of getting spammed with console messages, we should only see logs when the focus operation begins and ends. Test it out by pressing the autofocus button on the projector remote; you should see AUTOFOCUS STARTED and AUTOFOCUS FINISHED printed in the terminal.
You might have noticed a problem — if you restart the script again now, you’ll likely see the AUTOFOCUS STARTED and AUTOFOCUS FINISHED messages appear again. This is because the projector device is always writing logs whether we are listening to them or not via logcat; so when we do call logcat, it provides us with the last couple hundred lines of the logs. However, we want to ignore events that occurred before our script started, or it might interpret these old logs as happening right now and decide to press play/pause when we don’t want it to.
Fortunately the logcat command receives an argument that tells it to only send us logs that occur after a given timestamp.
To try it out, first you’ll need to type up a timestamp that will work for you. The format is month-date hour:minute:second.millisecond, where month is between 01 and 12, date is between 01 and 31, hour is between 00 and 23, and so on. It’s important that you add leading zeroes. For example, if your current local date/time is March 15 at 4:05pm, you will want to use the timestamp 03-15 16:05:00.000.
Pass the timestamp as an argument to logcat. Because the timestamp string has a space, you’ll have to make sure you wrap it in quotation marks:
adb -s <projector_ip>:5555 logcat -T '03-15 16:05:00.000'You’ll now only receive log messages that occur after that timestamp.
We’ll need to encode this in our script. We can use the built-in Date function in JavaScript to create a timestamp from the current time:
import { spawn } from "child_process";
import { createInterface } from "readline";

const PROJECTOR_HOST = "<projector_ip>:5555";

function getTimestamp() {
  const date = new Date();
  const month = String(date.getMonth() + 1).padStart(2, "0");
  const day = String(date.getDate()).padStart(2, "0");
  const hour = String(date.getHours()).padStart(2, "0");
  const minute = String(date.getMinutes()).padStart(2, "0");
  const second = String(date.getSeconds()).padStart(2, "0");
  const millis = String(date.getMilliseconds()).padStart(3, "0");

  return `${month}-${day} ${hour}:${minute}:${second}.${millis}`;
}

function connectToProjector() {
  const child = spawn(
    "adb",
    ["connect", PROJECTOR_HOST],
    { stdio: "pipe" },
  );

  child.stdout.setEncoding("utf8");

  let stdout = "";
  child.stdout.on("data", (chunk) => {
    stdout += chunk;
  });

  child.on("close", () => {
    stdout = stdout.trim();

    if (
      stdout.startsWith("connected to") ||
      stdout.startsWith("already connected to")
    ) {
      console.log("Connected to projector");
      watchProjectorLogs();
    }
  });
}

function watchProjectorLogs() {
  const child = spawn(
    "adb",
    ["-s", PROJECTOR_HOST, "logcat", "-T", getTimestamp()],
    { stdio: "pipe" },
  );

  child.stdout.setEncoding("utf8");
  child.stderr.setEncoding("utf8");

  const readline = createInterface(child.stdout);

  readline.on("line", (line) => {
    if (line.includes("TaskManager: add task:FeelingFocusTask")) {
      console.log("AUTOFOCUS STARTED");
    } else if (line.includes("FeelingFocusTask: onFocusFinished")) {
      console.log("AUTOFOCUS FINISHED");
    }
  });

  child.stderr.on("data", (chunk) => {
    console.log("STDERR CHUNK RECEIVED:", chunk);
  });

  child.on("close", () => {
    console.log("logcat exited");
  });
}

connectToProjector();
Try killing the script via Ctrl + C and starting it again. Now you shouldn’t see the AUTOFOCUS STARTED and AUTOFOCUS FINISHED messages until you try pressing the autofocus button again on the projector remote.
Pausing the Fire TV during autofocus
First, let’s make sure we are connected to the Fire TV by calling adb connect programmatically like we did with the projector. We’ll replace our connectToProjector function with a more generic version that can connect to a device given its IP and run a function when the connection is established:
import { spawn } from "child_process";
import { createInterface } from "readline";

const PROJECTOR_HOST = "<projector_ip>:5555";

function getTimestamp() {
  const date = new Date();
  const month = String(date.getMonth() + 1).padStart(2, "0");
  const day = String(date.getDate()).padStart(2, "0");
  const hour = String(date.getHours()).padStart(2, "0");
  const minute = String(date.getMinutes()).padStart(2, "0");
  const second = String(date.getSeconds()).padStart(2, "0");
  const millis = String(date.getMilliseconds()).padStart(3, "0");

  return `${month}-${day} ${hour}:${minute}:${second}.${millis}`;
}

function connectToAdb(host, onClose) {
  const child = spawn(
    "adb",
    ["connect", host],
    { stdio: "pipe" },
  );

  child.stdout.setEncoding("utf8");

  let stdout = "";
  child.stdout.on("data", (chunk) => {
    stdout += chunk;
  });

  child.on("close", () => {
    stdout = stdout.trim();
    if (
      stdout.startsWith("connected to") ||
      stdout.startsWith("already connected to")
    ) {
      onClose();
    }
  });
}

function start() {
  connectToAdb(PROJECTOR_HOST, () => {
    console.log("Connected to projector");
    watchProjectorLogs();
  });
}

function watchProjectorLogs() {
  const child = spawn(
    "adb",
    ["-s", PROJECTOR_HOST, "logcat", "-T", getTimestamp()],
    { stdio: "pipe" },
  );

  child.stdout.setEncoding("utf8");
  child.stderr.setEncoding("utf8");

  const readline = createInterface(child.stdout);

  readline.on("line", (line) => {
    if (line.includes("TaskManager: add task:FeelingFocusTask")) {
      console.log("AUTOFOCUS STARTED");
    } else if (line.includes("FeelingFocusTask: onFocusFinished")) {
      console.log("AUTOFOCUS FINISHED");
    }
  });

  child.stderr.on("data", (chunk) => {
    console.log("STDERR CHUNK RECEIVED:", chunk);
  });

  child.on("close", () => {
    console.log("logcat exited");
  });
}

start();
Then we can use the same function to also connect to the Fire TV:
import { spawn } from "child_process";
import { createInterface } from "readline";

const PROJECTOR_HOST = "<projector_ip>:5555";
const FIRETV_HOST = "<firetv_ip>:5555";

function getTimestamp() {
  const date = new Date();
  const month = String(date.getMonth() + 1).padStart(2, "0");
  const day = String(date.getDate()).padStart(2, "0");
  const hour = String(date.getHours()).padStart(2, "0");
  const minute = String(date.getMinutes()).padStart(2, "0");
  const second = String(date.getSeconds()).padStart(2, "0");
  const millis = String(date.getMilliseconds()).padStart(3, "0");

  return `${month}-${day} ${hour}:${minute}:${second}.${millis}`;
}

function connectToAdb(host, onClose) {
  const child = spawn(
    "adb",
    ["connect", host],
    { stdio: "pipe" },
  );

  child.stdout.setEncoding("utf8");

  let stdout = "";
  child.stdout.on("data", (chunk) => {
    stdout += chunk;
  });

  child.on("close", () => {
    stdout = stdout.trim();
    if (
      stdout.startsWith("connected to") ||
      stdout.startsWith("already connected to")
    ) {
      onClose();
    }
  });
}

function start() {
  connectToAdb(PROJECTOR_HOST, () => {
    console.log("Connected to projector");

    connectToAdb(FIRETV_HOST, () => {
      console.log("Connected to Fire TV");
      watchProjectorLogs();
    });
  });
}

function watchProjectorLogs() {
  const child = spawn(
    "adb",
    ["-s", PROJECTOR_HOST, "logcat", "-T", getTimestamp()],
    { stdio: "pipe" },
  );

  child.stdout.setEncoding("utf8");
  child.stderr.setEncoding("utf8");

  const readline = createInterface(child.stdout);

  readline.on("line", (line) => {
    if (line.includes("TaskManager: add task:FeelingFocusTask")) {
      console.log("AUTOFOCUS STARTED");
    } else if (line.includes("FeelingFocusTask: onFocusFinished")) {
      console.log("AUTOFOCUS FINISHED");
    }
  });

  child.stderr.on("data", (chunk) => {
    console.log("STDERR CHUNK RECEIVED:", chunk);
  });

  child.on("close", () => {
    console.log("logcat exited");
  });
}

start();
Now we need to actually tell the Fire TV to pause when the autofocus starts and resume playback when it finishes. Since, once again, node.js is naturally asynchronous, we will want to stop reading lines from the logs while we send the pause command to the Fire TV and then resume reading the logs when the command finishes. Luckily, this is another core feature of node.js streams — they come with pause() and resume() methods. While a stream is paused, it’ll continue to read data from our stdout stream, but it’ll hold the data in memory until it is resumed.
import { spawn } from "child_process";
import { createInterface } from "readline";

const PROJECTOR_HOST = "<projector_ip>:5555";
const FIRETV_HOST = "<firetv_ip>:5555";

function getTimestamp() {
  const date = new Date();
  const month = String(date.getMonth() + 1).padStart(2, "0");
  const day = String(date.getDate()).padStart(2, "0");
  const hour = String(date.getHours()).padStart(2, "0");
  const minute = String(date.getMinutes()).padStart(2, "0");
  const second = String(date.getSeconds()).padStart(2, "0");
  const millis = String(date.getMilliseconds()).padStart(3, "0");

  return `${month}-${day} ${hour}:${minute}:${second}.${millis}`;
}

function connectToAdb(host, onClose) {
  const child = spawn(
    "adb",
    ["connect", host],
    { stdio: "pipe" },
  );

  child.stdout.setEncoding("utf8");

  let stdout = "";
  child.stdout.on("data", (chunk) => {
    stdout += chunk;
  });

  child.on("close", () => {
    stdout = stdout.trim();
    if (
      stdout.startsWith("connected to") ||
      stdout.startsWith("already connected to")
    ) {
      onClose();
    }
  });
}

function start() {
  connectToAdb(PROJECTOR_HOST, () => {
    console.log("Connected to projector");

    connectToAdb(FIRETV_HOST, () => {
      console.log("Connected to Fire TV");
      watchProjectorLogs();
    });
  });
}

function watchProjectorLogs() {
  const child = spawn(
    "adb",
    ["-s", PROJECTOR_HOST, "logcat", "-T", getTimestamp()],
    { stdio: "pipe" },
  );

  child.stdout.setEncoding("utf8");
  child.stderr.setEncoding("utf8");

  const readline = createInterface(child.stdout);

  readline.on("line", (line) => {
    if (
      line.includes("TaskManager: add task:FeelingFocusTask") ||
      line.includes("FeelingFocusTask: onFocusFinished")
    ) {
      console.log("AUTOFOCUS STARTED/FINISHED");
      readline.pause();
      pressPlayPause(() => readline.resume());
    }
  });

  child.stderr.on("data", (chunk) => {
    console.log("STDERR CHUNK RECEIVED:", chunk);
  });

  child.on("close", () => {
    console.log("logcat exited");
  });
}

function pressPlayPause(onClose) {
  const child = spawn(
    "adb",
    ["-s", FIRETV_HOST, "shell", "input", "keyevent", "85"],
    { stdio: "pipe" },
  );

  child.on("close", () => onClose());
}

start();
Let’s test it out! Go ahead and kill and restart the script. Then make sure some video is playing on the Fire TV, and hit the autofocus button on the projector remote. If all goes well, your video should pause when the autofocus process begins and resume when it completes!
Using pm2 to keep the script running
Now we have a script that will run for as long as logcat can keep a connection with the projector. However, sooner or later, the adb connection will be dropped, and our script will exit.
However, since we want our service to run forever on our Raspberry Pi, we should make sure that whenever our script exits, it will automatically restart.
pm2 is a node.js process manager. We can leverage pm2 to automatically restart our app whenever it exits, and even configure the Pi to start our script as soon as it boots up — so if the Pi ever loses power or reboots for any reason, our script will start running once it’s back online.
Installing pm2
To install pm2, just run the following command:
npm install -g pm2We have to configure the Raspberry Pi OS to use pm2 automatically when it boots up. pm2 can help us with that configuration. Run the following command:
pm2 startupThis command will print out to the console another command. You’ll have to copy/paste it to finish setting up (reminder that in Terminal, the copy shortcut is Ctrl + Shift + C and the paste shortcut is Ctrl + Shift + V).
Running the script with pm2
Once you’ve run that command, it’s time to tell pm2 to start our script. If you already have the script running, make sure you press Ctrl + C in that terminal window to stop it. Then use the following command to start the script using pm2:
pm2 start --restart-delay 60000 ~/Desktop/projector_script/main.mjsThis command instructs pm2 to start the node script located at ~/Desktop/projector_script/main.mjs. When the script exits, it will wait 60 seconds, then start the script again.
Once pm2 start has been executed, our script will be running. However, since it’s being controlled by the pm2 process, we no longer see the log output printed to our terminal. We can check that our script is indeed running with another command:
pm2 statusAnd we can also use another command to watch the logs of our script:
pm2 logsIf we make changes to our script, we’ll want to restart the process. There’s a command for that too!
pm2 restart allOnce pm2 is running the script, enter this command:
pm2 saveThis command will save the processes we are currently running via pm2, so that when the Pi is rebooted, those same scripts will start up again.
Reserving the IP addresses on your router
Our script is complete! The last step is making sure that the IP addresses of our devices don’t change. Normally, a device connected to a router will “lease” its IP address for a certain amount of time, and when that time expires, it will get a new IP address. However, our script relies on the IPs of the projector and Fire TV to remain static.
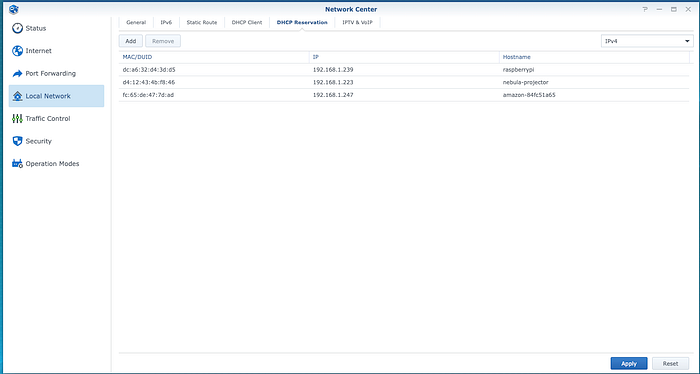
Configuring this will vary depending on your WiFi router. You’ll need to configure your router, which is typically done through a web interface, depending on the brand/model of your router. You’ll need to use the DHCP Reservation feature of your router.
I have a Synology router, so I logged into the web interface and opened Network Center and clicked on Local Network, then DHCP Client. This showed me a list of devices connected to my network, including their MAC address and their currently assigned IP.

I selected my Fire TV Stick and pressed the Add to Address Reservation button, which added it to the list under DHCP Reservation. I repeated the process with the Nebula Cosmos projector to reserve its IP address as well:
And that’s it!
Afterword
There’s plenty of room for improvement with our script. For example:
- We could pass more arguments to
adb logcatto filter the messages using the cli rather than with JavaScript code - We could figure out if there is a way to use adb to determine whether the Fire TV is actually currently playing video before we call the
pressPlayPause()function. Right now our script is a little naive, and will press the play/pause button regardless of whether media is actually playing - We could make sure that every time we spawn a child process that we also monitor the
stderrstream so that we are aware if any of our commands return error messages - We could terminate our script early if an error occurs when our commands fail. For example, if the
adb shell inputcommand fails, we can assume that the Fire TV is off or unavailable and stop the process from reading more logs from theadb logcatstream
But this should get us started.
Have fun hacking!